AppleScript
非程序员用的,这个比较低端;
用于生产环境下,才是最适合的!
 Apple Script
苹果(Apple)的剧本
jsx
首先了解一下 Apple 公司创造 AppleScript 的初衷,它是用来编写运行于mac的脚本的。重要的是它是 mac 上操作应用程序为数不多的途径之一。
用途
- 可以用来书写脚本直接生成脚本文件(.scpt)、App 文件;
- 可以用来编写 Cocoa App(也可以创建 Automation Action);
- 可以在 Alfred.app 和 Autormator.app 中使用;
- 可以非常方便的在 Shell 和 OC 中调用执行;
编辑器
ScriptEditor;MacOS 上有自带的脚本编辑器,目前支持 AppleScript 和 JavaScript。 其中有模版工程、模版代码、应用词典等功能,极大方便了 AppleScript/JavaScript 脚本的编写。
语法
AppleScript有4种最基本的数据类型:number、string、list和record;数值、字符串、数组和字典。
number 类型
n.scpt 文件的名字
set x to 2
get x
set y to 3
get y
set xy to x * y
set x3 to y ^ 3

output:27.0
string 类型
set strX to "Hello "
set strY to "AppleScript"

-- 字符串拼接
set strXY to strX & strY
-- 获取字符串长度
set lengthOfStrXY to the length of strXY

-- 分割成单个字符并组成一个新的列表
set charList to every character of strXY

-- 通过 AppleScript's text item delimiters 来指定分隔号,然后通过 every text item of 来实现分割
set defaultDelimiters to AppleScript's text item delimiters
set AppleScript's text item delimiters to " "
set listAfterDelimiter to every text item of strXY
set AppleScript's text item delimiters to defaultDelimiters


-- number 与 string 类型转换
set numberToString to 100 as string
set stringToNumber to "1234" as number


output :1234
list 类型
set firstList to { 100, 200.0, "djfif", -10 }
set emptyList to {}
set currentList to { 2, 3, 4, 5 }

-- 列表拼接
set modifiedList to firstList & emptyList & currentList

-- 获取和更改列表中的元素
set item 2 of modifiedList to "2"
get modifiedList
set the third item of modifiedList to "abcde"
get modifiedList

-- 用列表中的随机元素赋值
set randomX to some item of modifiedList

-- 获取最后一个元素
set lastItem to the last item of modifiedList

-- 负数表示从列表尾端开始获取元素
set aLastItem to item -2 of modifiedList

-- 获取第一个元素
set firstItem to the first item of modifiedList

set longList to { 1,2,3,4,5,6,7,8,9,10 }
set shortList to items 6 through 8 of longList

-- 逆向获取子列表
set reversedList to reverse of longList
set listCount to the count of longList
set the end of longList to 5
get longList

-- 将 string 转换为 list
set string1 to "string1"
set stringList to string1 as list

-- 可以用&将字符串和列表连接起来,结果取决于&前面的变量
set strAndList to string1 & stringList

output:
"string1string1"
record 类型
set aRecord to { name1:100, name2:"This is a record"}
set valueOfName1 to the name1 of aRecord

set newRecord to { name1:name1 of aRecord }

set numberOfProperties to the count of aRecord

output:2
条件/循环
```jsxj s set x to 500
if x > 100 then display alert “x > 100” else if x > 10 then display alert “x > 10” else display alert “x <= 10” end if
set sum to 0 set i to 0 repeat 100 times set i to i + 1 set sum to sum + i end repeat get sum
repeat with counter from 0 to 10 by 2 display dialog counter end repeat
set counter to 0 set listToSet to {} – 注意下这个 ≠ 符号是使用 Option+= 输入的 repeat while counter ≠ 10 – display dialog counter as string set listToSet to listToSet & counter set counter to counter + 2 end repeat get listToSet
set counter to 0 set listToSet to {} repeat until counter = 10 – display dialog counter as string set listToSet to listToSet & counter set counter to counter + 2 end repeat get listToSet
set aList to {1, 2, 8} repeat with anItem in aList display dialog anItem as string end repeat
output :输出 x>100 0 2 4 6 8 10 1 2 8
{button returned:”好”}
- 注释

  ```applescript
  -- 这是单行的注释

  (*
  这是多行的注释
  这是多行的注释
  *)
-
函数
on showAlert(alertStr) display alert alertStr buttons {"I know", "Cancel"} default button "I know" end showAlert showAlert("hello world") -
换行
on showAlert(alertStr) display alert alertStr buttons {"I know", "Cancel"} default button "I know" end showAlert showAlert("hello world") -
使用AppleScript中的对话框
使用弹出框有一些要注意的地方:
- 1.它可以有多个按钮的;
- 2.它是有返回值的,返回值是你最终操作的字符串;
- 3.它是可以增加输入框的,而且比你想的简单多了;
set dialogString to "Input a number here" set returnedString to display dialog dialogString default answer "" get returnedString --//{button returned:"好", text returned:"asdf"} set dialogString to "Input a number here" set returnedString to display dialog dialogString default answer "" set returnedNumber to the text returned of returnedString try set returnedNumber to returnedNumber as number set calNumber to returnedNumber * 100 display dialog calNumber on error the error_message number the error_number display dialog "Error:" & the error_number & " Details:" & the error_message end try beep -
预定义变量
就是一些特殊的关键字,类似于其他语言中的 self、return等,有固定的含义;
千万不要用它来自定义变量。
- result:记录最近一个命令执行的结果,如果命令没有结果,那么将会得到错误
- it:指代最近的一个 tell 对象
- me:这指代段脚本。用法举例 path to me 返回本脚本所在绝对路径
- tab:用于string,一个制表位
- return:用于string,一个换行
-
字符串比较:Considering/Ignoring语句
在 AppleScript 的字符串比较方式中,你可以设定比较的方式:上面 considering 和 ignoring 含义都是清晰的,一个用于加上xx特征,一个用于忽略某个特征;一个特征就是一个attribute。 atrribute应该为列表中的任意一个:
- case 大小写 - diacriticals 字母变调符号(如e和é) - hyphens 连字符(-) - numeric strings 数字化字符串(默认是忽略的),用于比较版本号时启用它。 - punctuation 标点符号(,.?!等等,包括中文标点) - white space 空格 -
列表选择对话框
ignoring case
	if "AAA" = "aaa" then
		display alert "AAA equal aaa when ignoring case"
	end if
end ignoring

considering numeric strings
	if "10.3" > "9.3" then
		display alert "10.3 > 9.3"
	end if
end considering
--列表选择对话框
display alert "这是一个警告" message "这是警告的内容" as warning
choose from list {"选项1", "选项2", "选项3"} with title "选择框" with prompt "请选择选项"
选择框有以下参数:
- 直接参数 紧跟list类型参数,包含所有备选项 - title 紧跟text,指定对话框的标题 - prompt 紧跟text,指定提示信息 - default items 紧跟list,指定默认选择的项目 - empty selection allowed 后紧跟true表示允许不选 - multiple selections allowed 后紧跟true表示允许多选 -
文件选择对话框
-- 选取文件名称Choose File Name choose file name with prompt "指定提示信息" -- 选取文件夹Choose Folder choose folder with prompt "指定提示信息" default location file "Macintosh HD:Users" with invisibles, multiple selections allowed and showing package contents -- 选取文件Choose File choose file of type {"txt"} -
文件读取和写入
文件读取用read,允许直接读取;
但是写入文件之前必须先打开文件,打开文件是open for access FileName;
写入文件用write…to语句;
最后记得关闭文件close access filePoint
-
其它语法
上面的例子只是苹果官方文档的精简入门版,还有语言的面相对象特征,此处不再展开。
AppleScript 中还有比较丰富的其它 Command 集合,此处也不再一一列举。
案例
-
使用 mac 的邮件系统
mail.scpt文件名
--Variables set recipientName to " 小红" set recipientAddress to "aliyunzixun@xxx.com" set theSubject to "AppleScript Automated Email" set theContent to "This email was created and sent using AppleScript!" --Mail Tell Block tell application "Mail" --Create the message set theMessage to make new outgoing message with properties {subject:theSubject, content:theContent, visible:true} --Set a recipient tell theMessage make new to recipient with properties {name:recipientName, address:recipientAddress} --Send the Message send end tell end tell ----下面是编辑好的!需要先打开mac的邮件,设置好,才可以 --Variables set recipientName to " 小杰" set recipientAddress to "pc554328955@gmail.com" --set recipientAddress to "2951749090@qq.com" set theSubject to "respect you" set theContent to "吾日三省吾身,传不习乎,与朋友交而不信乎,为人谋而不忠乎," --Mail Tell Block tell application "Mail" --Create the message set theMessage to make new outgoing message with properties {subject:theSubject, content:theContent, visible:true} --Set a recipient tell theMessage make new to recipient with properties {name:recipientName, address:recipientAddress} --Send the Message send end tell end tell -
让浏览器打开网页
set urlMyBlog to "https://blog.csdn.net/sodaslay"
set urlChinaSearch to "http://www.chinaso.com"
set urlBiying to "https://cn.bing.com"

--使用Chrome浏览器
tell application "Google Chrome"
  --新建一个chrome窗口
  set window1 to make new window
  tell window1
      --当前标签页加载必应,就是不用百度哈哈
      set currTab to active tab of window1
      set URL of currTab to urlBiying
      --打开csdn博客,搜索
      make new tab with properties {URL:urlMyBlog}
      make new tab with properties {URL:urlChinaSearch}
      --将焦点由最后一个打开的标签页还给首个标签页
      set active tab index of window1 to 1
  end tell
end tell


--打开浏览器
set urlMyBlog to "https://www.baidu.com"
set urlChinaSearch to "https://fibncci.github.io/about/"
set urlBiying to "https://fibncci.github.io/2019/09/5G/"

--使用Chrome浏览器
tell application "Google Chrome"
	--新建一个chrome窗口
	set window1 to make new window
	tell window1
		--就是百度哈哈
		set currTab to active tab of window1
		set URL of currTab to urlBiying
		--打开csdn博客,搜索
		make new tab with properties {URL:urlMyBlog}
		make new tab with properties {URL:urlChinaSearch}
		--将焦点由最后一个打开的标签页还给首个标签页
		set active tab index of window1 to 1
	end tell
end tell
python自动发邮件
import smtplib
from email.mime.text import MIMEText
'''
发送邮件函数,默认使用163smtp
:param mail_host: 邮箱服务器,16邮箱host: smtp.163.com
:param port: 端口号,163邮箱的默认端口是 25
:param username: 邮箱账号 xx@163.com
:param passwd: 邮箱密码(不是邮箱的登录密码,是邮箱的授权码)
:param recv: 邮箱接收人地址,多个账号以逗号隔开
:param title: 邮件标题
:param content: 邮件内容
:return:
'''
def send_mail(username, passwd, recv, title, content, mail_host='smtp.163.com', port=25):
  msg = MIMEText(content)  # 邮件内容
  msg['Subject'] = title   # 邮件主题
  msg['From'] = username   # 发送者账号
  msg['To'] = recv      # 接收者账号列表
  smtp = smtplib.SMTP(mail_host, port=port)   # 连接邮箱,传入邮箱地址,和端口号,smtp的端口号是25
  smtp.login(username, passwd)          # 登录发送者的邮箱账号,密码
  # 参数分别是 发送者,接收者,第三个是把上面的发送邮件的 内容变成字符串
  smtp.sendmail(username, recv, msg.as_string())
  smtp.quit() # 发送完毕后退出smtp
  print('email send success.')

if __name__ == '__main__':
  email_user = 'pc554328955@qq.com' # 发送者账号

  email_user = 'pc554328955@163.com' # 发送者账号
  # email_pwd = "'ww1234','mrrzqsaxcfukbcbf'" # 发送者密码,授权码
  email_pwd = '.' # 发送者密码,授权码
  # maillist = '787119359@qq.com'
  maillist = 'pc554328955@gmail.com'
  title = 'Give you my utmost respect'
  content = '想念你了,你呢?有没有想我呢,哦,真的没有吗? 那真的是太可惜了,算了我给你讲个故事吧 :哈哈,没了。'
  send_mail(email_user, email_pwd, maillist, title, content)
-
让你的电脑说话(哈哈)
-- You can use any of the voices from the System Voice pop-up on the Text to Speech tab in the Speech preferences pane. -- Default Value: -- The current System Voice (set in the Speech panel in System Preferences. tell current application say "My name is LiMei. Nice to meet you. How are you?" using "Veena" say "Fine, thanks. And you?" using "Victoria" say "滚" say "我跟你说" using "Sin-Ji" say "love 亮亮" say "祝洁琼是猪!" end tell beep -
调用 mac 的通知中心
crontab + AppleScript + 通知中心 可以做很多定制的提醒工具
display notification "message" with title "title" subtitle "subtitle" display notification "message" sound name "Bottle.aiff" -- 声音文件都在 ~/Library/Sounds 和 /System/Library/Sounds 下面 -
清理废纸篓
tell application "Finder" empty the trash beep -- 打开启动磁盘 open the startup disk end tell -
模拟键盘按键消息
launch application "System Events"
launch application "TextMate"
tell application "System Events"
  set frontmost of process "TextMate" to true
  keystroke "input string from applescript"
  keystroke "a" using command down
  keystroke "c" using command down
  keystroke "a" using command down
  key code 124 using command down
  keystroke "
"
  keystroke "v" using command down
end tell
其中 using command 可以使用组合,例如:key code 53 using {command down, option down}
其中的 key code 对照表如下
-
切换程序前台、设置焦点窗口
-- 前提是当前 iTerm app 中打开了两个窗口,其中有个窗口名字叫 "2. bash" 并且该窗口中第一个 tab 中含有三个 session,本脚本的作用是让 "2. bash" 窗口中第一个 tab 中的第三个 session 变为焦点。
tell the application "iTerm"
  activate

  set theWindow to the first item of ¬
      (get the windows whose name is "2. bash")
  if index of theWindow is not 1 then
      set index of theWindow to 1

      set visible of theWindow to false
      set visible of theWindow to true
  end if

  tell theWindow
      set theTab to the first item of theWindow's tabs

      select theTab

      select the third session of theTab
  end tell
end tell
-- 下面是上面的逻辑的另一种实现 tell the application "iTerm" activate set theWindow to the first item of ¬ (get the windows whose name is "2. bash") if the index of theWindow is not 1 then set the index of theWindow to 2 tell application "System Events" to ¬ tell application process "iTerm2" to ¬ keystroke "`" using command down end if end tell -
粘贴板操作(有问题)
set the clipboard to "Add this sentence at the end."
tell application "TextEdit"
  activate --make sure TextEdit is running
  make new paragraph at end of document 1 with data (return & (the clipboard))
end tell
何时使用?
- 一些跨应用的重复操作步骤使用 AppleScript/JavaScript 实现关键步骤
- 结合 Alread.app、Automator.app、crontab 等实现一些场景的触发调用
- 本地的一些工具脚本可以直接调用 AppleScript 做一些简单的输入、弹框、通知交互
- 用 AppleScript 写一个 CocoaApp 或者 Automator Action(但是可以用 Objective-C 我们就没必要使用相对不熟悉的 AppleScript)
- OC 的命令行工程可以借助 NSAppleScript 操作其它应用
- CocoaApp 工程可以通过 XPCService+ScriptingBridge+AppleScript(OC版本接口调用)启动其它应用看文献
生成 Cocoa App 的 OC 接口文件
需要通过 OC 调用系统中某个 App 的接口,可以参照如下命令行导出其 .h 文件
sdef /Applications/Mail.app | sdp -fh -o ~/Desktop --basename Mail --bundleid `defaults read "/Applications/Mail.app/Contents/Info" CFBundleIdentifier`
更改图标
如何更改 mac的应用程序图标
必须是源文件是png文件;
如何更改 OS X 的应用程序图标
第一步:打开 Finder 应用程序,选择「应用程序」文件夹,然后选择你要更改图标的应用程序。在本文例子中,我将更换掉默认的 iTunes 图标。 第二步:右键单击该应用程序并选择「显示简介」(或按下「Command + I」快捷键)。 第三步:在应用程序信息面板的左上角,你可以看到应用程序的图标。现在将新的应用程序图标文件拖拽拖过来,然后释放鼠标按键即可。你还会看到一个更换动画。 当然你也可以使用快捷键:在 Finder 应用程序中选中新的图标文件,鼠标右键单击,选择「复制」,或选中该文件,然后按下「Command + C」,接着返回应用程序的信息面板,选中左上角原本的图标,然后按下「Command + V」粘贴即可。 注:OS X 可能会要求你输入管理员密码来确认更改应用程序的图标。 如果应用程序在你的 Dock 上,你会发现新更换的图标没有显示,我们还需要做一次注销操作。 第四步:打开「终端」应用程序,然后键入「killall Dock」(不带方括号),然后按下「Enter」键确认即可。
如何恢复到应用程序原来的图标
第一步:打开 Finder 应用程序,找到「应用程序」文件夹,然后选择你要恢复图标的应用程序。 第二步:右键单击该应用程序,选择「显示简介」选项(或按下「Command + I」快捷键)。 第三步:在应用程序信息面板的左上角,你可以看到应用程序的图标。单击它使其高亮显示。 第四步:按下「Delete」键。该应用程序的图标就会即刻恢复到原来的样子。
合并jpg和png出错
python中用PIL合并jpg和png出错。我的png图片是我自作聪明,直接将一个jpg格式的图片重命名的,根本就不是个png,真的是有点蠢,记录下来,以后不干这事儿了。。。。
打开方式>预览.app>找到菜单栏(左上角)文件 > 导出> 格式png>存储
代码 QRCODE模块
# -*- coding: UTF-8 -*-

from PIL import Image
import qrcode

qr = qrcode.QRCode(
  version=1,
  error_correction=qrcode.constants.ERROR_CORRECT_Q,
  box_size=10,
  border=4,
)
qr.add_data('恭喜你!\n中奖了!\n你要做的有三件事:\n1.告诉领导你不干了\n2.垂询16899888查询详情\n3.告诉领导你不敢了\n哈哈')
qr.make(fit=True)
img = qr.make_image()
img = img.convert("RGBA")

icon = Image.open("C:/1.png")

img_w,img_h = img.size
factor = 4
size_w = int(img_w / factor)
size_h = int(img_h / factor)

icon_w,icon_h = icon.size
if icon_w >size_w:
    icon_w = size_w
if icon_h > size_h:
    icon_h = size_h
icon = icon.resize((icon_w,icon_h),Image.ANTIALIAS)

w = int((img_w - icon_w) / 2)
h = int((img_h - icon_h) / 2)
img.paste(icon, (w, h), icon)
img.save('hah.png')
jpg和png文件头,图片更改文件后缀名有什么影响
一般文件内容开头都会有一个文件类型的标记;

测试:
下面我测试了一下同一张图片更改后缀名以后的的文件头和文件信息是否变化
微信的图标。分别修改后缀名为jpg png pn(随便改的,就试一下看文件信息变化不)
使用压缩软件的文件MD5计算分别计算jpg png pn三种不同后缀名的同一个文件。
PS:GIF(录GIF使用的是gifcam.exe)
以下是三个生成的txt的文件信息
使用文件对比工具Beyongd Compare比较三个text文本,可以看到只有文件名不一样,其他全部一样;
然后用文件格式识别工具查看以下文件的文件头信息,使用网上的一个软件;
下载地址:http://www.downg.com/soft/42543.html#down
三个文件文件头相同。
总结:更改后缀名只是更改文件的名称,文件自身编码格式以及内容不发生变化。
java软件识别文件头的原理
package com;

import java.io.FileInputStream;
import java.io.FileNotFoundException;
import java.io.IOException;
import java.util.Date;
import java.util.HashMap;
import java.util.Iterator;
import java.util.Map;
import java.util.Set;

public class FileType {

	public final static Map<String, String> FILE_TYPE_MAP = new HashMap<String, String>();

    private FileType(){}
    static{
        getAllFileType(); //初始化文件类型信息
    }

    /**
     * Discription:[getAllFileType,常见文件头信息]
     */
    private static void getAllFileType()
    {
        FILE_TYPE_MAP.put("ffd8ffe000104a464946", "jpg"); //JPEG (jpg)
        FILE_TYPE_MAP.put("89504e470d0a1a0a0000", "png"); //PNG (png)
        FILE_TYPE_MAP.put("47494638396126026f01", "gif"); //GIF (gif)
        FILE_TYPE_MAP.put("49492a00227105008037", "tif"); //TIFF (tif)
        FILE_TYPE_MAP.put("424d228c010000000000", "bmp"); //16色位图(bmp)
        FILE_TYPE_MAP.put("424d8240090000000000", "bmp"); //24位位图(bmp)
        FILE_TYPE_MAP.put("424d8e1b030000000000", "bmp"); //256色位图(bmp)
        FILE_TYPE_MAP.put("41433130313500000000", "dwg"); //CAD (dwg)
        FILE_TYPE_MAP.put("3c21444f435459504520", "html"); //HTML (html)
        FILE_TYPE_MAP.put("3c21646f637479706520", "htm"); //HTM (htm)
        FILE_TYPE_MAP.put("48544d4c207b0d0a0942", "css"); //css
        FILE_TYPE_MAP.put("696b2e71623d696b2e71", "js"); //js
        FILE_TYPE_MAP.put("7b5c727466315c616e73", "rtf"); //Rich Text Format (rtf)
        FILE_TYPE_MAP.put("38425053000100000000", "psd"); //Photoshop (psd)
        FILE_TYPE_MAP.put("46726f6d3a203d3f6762", "eml"); //Email [Outlook Express 6] (eml)
        FILE_TYPE_MAP.put("d0cf11e0a1b11ae10000", "doc"); //MS Excel 注意:word、msi 和 excel的文件头一样
        FILE_TYPE_MAP.put("d0cf11e0a1b11ae10000", "vsd"); //Visio 绘图
        FILE_TYPE_MAP.put("5374616E64617264204A", "mdb"); //MS Access (mdb)
        FILE_TYPE_MAP.put("252150532D41646F6265", "ps");
        FILE_TYPE_MAP.put("255044462d312e350d0a", "pdf"); //Adobe Acrobat (pdf)
        FILE_TYPE_MAP.put("2e524d46000000120001", "rmvb"); //rmvb/rm相同
        FILE_TYPE_MAP.put("464c5601050000000900", "flv"); //flv与f4v相同
        FILE_TYPE_MAP.put("00000020667479706d70", "mp4");
        FILE_TYPE_MAP.put("49443303000000002176", "mp3");
        FILE_TYPE_MAP.put("000001ba210001000180", "mpg"); //
        FILE_TYPE_MAP.put("3026b2758e66cf11a6d9", "wmv"); //wmv与asf相同
        FILE_TYPE_MAP.put("52494646e27807005741", "wav"); //Wave (wav)
        FILE_TYPE_MAP.put("52494646d07d60074156", "avi");
        FILE_TYPE_MAP.put("4d546864000000060001", "mid"); //MIDI (mid)
        FILE_TYPE_MAP.put("504b0304140000000800", "zip");
        FILE_TYPE_MAP.put("526172211a0700cf9073", "rar");
        FILE_TYPE_MAP.put("235468697320636f6e66", "ini");
        FILE_TYPE_MAP.put("504b03040a0000000000", "jar");
        FILE_TYPE_MAP.put("4d5a9000030000000400", "exe");//可执行文件
        FILE_TYPE_MAP.put("3c25402070616765206c", "jsp");//jsp文件
        FILE_TYPE_MAP.put("4d616e69666573742d56", "mf");//MF文件
        FILE_TYPE_MAP.put("3c3f786d6c2076657273", "xml");//xml文件
        FILE_TYPE_MAP.put("494e5345525420494e54", "sql");//xml文件
        FILE_TYPE_MAP.put("7061636b616765207765", "java");//java文件
        FILE_TYPE_MAP.put("406563686f206f66660d", "bat");//bat文件
        FILE_TYPE_MAP.put("1f8b0800000000000000", "gz");//gz文件
        FILE_TYPE_MAP.put("6c6f67346a2e726f6f74", "properties");//bat文件
        FILE_TYPE_MAP.put("cafebabe0000002e0041", "class");//bat文件
        FILE_TYPE_MAP.put("49545346030000006000", "chm");//bat文件
        FILE_TYPE_MAP.put("04000000010000001300", "mxp");//bat文件
        FILE_TYPE_MAP.put("504b0304140006000800", "docx");//docx文件
        FILE_TYPE_MAP.put("d0cf11e0a1b11ae10000", "wps");//WPS文字wps、表格et、演示dps都是一样的
        FILE_TYPE_MAP.put("6431303a637265617465", "torrent");


        FILE_TYPE_MAP.put("6D6F6F76", "mov"); //Quicktime (mov)
        FILE_TYPE_MAP.put("FF575043", "wpd"); //WordPerfect (wpd)
        FILE_TYPE_MAP.put("CFAD12FEC5FD746F", "dbx"); //Outlook Express (dbx)
        FILE_TYPE_MAP.put("2142444E", "pst"); //Outlook (pst)
        FILE_TYPE_MAP.put("AC9EBD8F", "qdf"); //Quicken (qdf)
        FILE_TYPE_MAP.put("E3828596", "pwl"); //Windows Password (pwl)
        FILE_TYPE_MAP.put("2E7261FD", "ram"); //Real Audio (ram)
    }

	/**
	 * 得到上传文件的文件头
	 * @param src
	 * @return
	 */
	public static String bytesToHexString(byte[] src) {
		StringBuilder stringBuilder = new StringBuilder();
		if (src == null || src.length <= 0) {
			return null;
		}
		for (int i = 0; i < src.length; i++) {
			int v = src[i] & 0xFF;
			String hv = Integer.toHexString(v);
			if (hv.length() < 2) {
				stringBuilder.append(0);
			}
			stringBuilder.append(hv);
		}
		return stringBuilder.toString();
	}

	/**
	 * 根据制定文件的文件头判断其文件类型
	 * @param filePaht
	 * @return
	 */
	public static String getFileType(String filePaht){
		String res = null;
		try {
			FileInputStream is = new FileInputStream(filePaht);
			byte[] b = new byte[10];
			is.read(b, 0, b.length);
			String fileCode = bytesToHexString(b);

			System.out.println(fileCode);


			//这种方法在字典的头代码不够位数的时候可以用但是速度相对慢一点
			Iterator<String> keyIter = FILE_TYPE_MAP.keySet().iterator();
			while(keyIter.hasNext()){
				String key = keyIter.next();
				if(key.toLowerCase().startsWith(fileCode.toLowerCase()) || fileCode.toLowerCase().startsWith(key.toLowerCase())){
					res = FILE_TYPE_MAP.get(key);
					break;
				}
			}
		} catch (FileNotFoundException e) {
			e.printStackTrace();
		} catch (IOException e) {
			e.printStackTrace();
		}
		return res;
	}

	public static void main(String[] args) throws Exception {

		String type = getFileType("C:/test/eee.WMV");
		System.out.println("eee.WMV : "+type);
		System.out.println();

		type = getFileType("C:/test/350996.wav");
		System.out.println("350996.wav : "+type);
		System.out.println();

	}
}
在《现代汉语词典》中
“链接”是网络中常用的词语,指利用技术手段将网址、文字、图片等与相应的网页联系起来,一点击网址、文字、图片等就出现网页页面;
“连接”强调事物头尾相互衔接,事物之间有重合部分; “连接”有两个意思,一是“(事物)相互衔接”,二是“使连接”。
“联结”则强调有一种中间物质将两种事物结合、融合在一起。 “联结”的意思则是“结合(在一起)”。
图片
( 图形/图像)
jpg格式是用的最多的一种,在品质稍微降低地情况下,文件大小能大比例地缩小。又分为cmyk模式和rgb模式等,cmyk模式一般用于印刷、打印输出时用,分辨率一般会高于300dpi。rgb模式一般于电脑显示,如果用于印刷和打印输出会有一定的色差。
bmp格式现在用的不是很多,是微软推出的一种格式来;更多用于自带的画图软件等。一般的设计和办公软件都会支持bmp,一般没有特殊要求,不会应用这种格式。
webp格式是手机上最常用的一种格式,是google推出的一种格式;在品质差不多的情况下,比jpg格式能大幅缩小容量。现在广泛用于各大网站上,像微信公众号里面的图片基本是这种格式的,但缺点是,现在很多软件都还不支持这种格式,兼容性要差些。
gif格式主要用于动图显示,像网上常见的动图一般都是gif格式的,当然也有不是动图的gif图片,但相比jpg格式在文件大小和清晰度上都不占优势。GIF:1:256色 2:无损,编辑 保存时候,不会损失。 3:支持简单动画。4:支持boolean透明,也就是要么完全透明,要么不透明。GIF适合动画
JPEG格式:1:millions of colors(数以百万计的颜色); 2: 有损压缩, 意味着每次编辑都会失去质量。3:不支持透明。4:适合照片,实际上很多相机使用的都是这个格式。JPEG适合照片
png格式主要用于透明图片,就是图片的背景色是透明的,jpg格式图片的白色背景也是一种颜色,而透明的png图片,在置入到其它地方时,透明区域会显示底层的内容,不会产生覆盖。同样,如果不是透明的图片,存储为png格式时,和jpg格式相比在文件大小上不占有优势。
PNG:1:无损,其实PNG有好几种格式的,一般分为两类:PNG8和truecolor PNGs; 与GIF相比:它通常会产生较小的文件大小。它支持阿尔法(变量)透明度。无动画支持 与JPEG相比:文件更大;无损;因此可以作为JPEG图片中间编辑的中转格式。 结论:PNG8适合其他任何种类——图表,buttons,背景,图表等等。
常见图片格式详解
最简单的方式将这些“理论”讲清楚吧。常见的图片格式有bmp, jpg(jpeg), png, gif, webp等。
图像基本数据结构
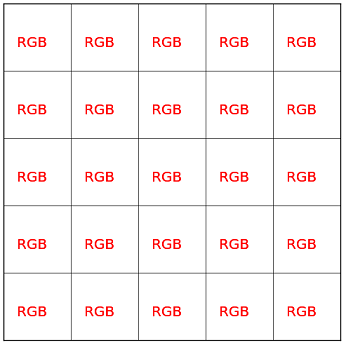
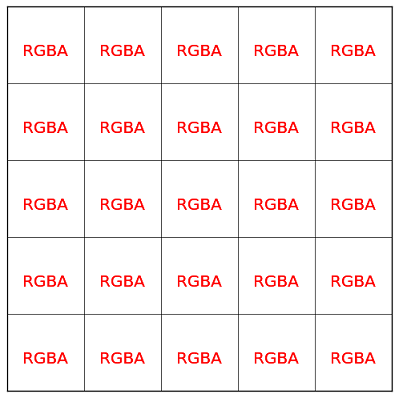
要讲图片格式还先得从图像的基本数据结构说起。在计算机中, 图像是由一个个像素点组成,像素点就是颜色点,而颜色最简单的方式就是用RGB或RGBA表示, 如图所示

(图1)

(图2)
如果有A通道就表明这个图像可以有透明效果。
R,G,B每个分量一般是用一个字节(8位)来表示,所以图(1)中每个像素大小就是38=24位图, 而图(2)中每个像素大小是48=32位。
这里有三点需要说明:
一、图像y方向正立或倒立
图像是二维数据,数据在内存中只能一维存储,二维转一维有不同的对应方式。比较常见的只有两种方式: 按像素“行排列”从上往下或者从下往上。

如图所示的图像有9个像素点,如果从上往下排列成一维数据是(123456789), 如果是从下往上排列则为(789456123)。 只所以会有这种区别是因为,前一种是以计算机图形学的屏幕坐标系为参考(右上为原点,y轴向下 ),而另后一种是以标准的数学坐标系为参考(右下为原点,y轴向上)。这两个坐标系只是y值不一样,互相转换的公式为:
y2 = height-1-y1
y1,y2分别为像素在两个坐标系中的y坐标,height为图像的高度。
不过好像只有bmp图片格式以及windows下的GDI,GDI+是从下往上排列,其它比如DirectX,OpenGL,Cocoa(NSImage, UIImage),OpenCV等都是从上往下排列。
二、RGB排列顺序
不同图形库中每个像素点中RGBA的排序顺序可能不一样。上面说过像素一般会有RGB,或RGBA四个分量,那么在内存中RGB的排列就有6种情况,如下:
- RGB
- RBG
- GRB
- GBR
- BGR
- BRG
RGBA的排列有24种情况,这里就不全部列出来了。 不过一般只会有RGB,BGR, RGBA, RGBA, BGRA这几种排列据。 绝大多数图形库或环境是BGR/BGRA排列,cocoa中的NSImage或UIImage是RGBA排列。
三、像素32位对齐
如果是RGB24位图,会存在一个32位对齐的问题—— 在x86体系下,cpu一次处理32整数倍的数据会更快,图像处理中经常会按行为单位来处理像素。24位图,宽度不是4的倍数时,其行字节数将不是32整数倍。这时可以采取在行尾添加冗余数据的方式,使其行字节数为32的倍数。 比如,如果图像宽为5像素,不做32位对齐的话,其行位数为24*5=120,120不是32的倍数。是32整数倍并且刚好比120大的数是128,也就只需要在其行尾添加1字节(8位)的冗余数据即可。(一个以空间换时间的例子) 有个公式可以轻松计算出32位对齐后每行应该占的字节数
byteNum = ((width * 24 + 31) & ~31)»3;
注意结果是字节数,如果想知道位数,还得x8
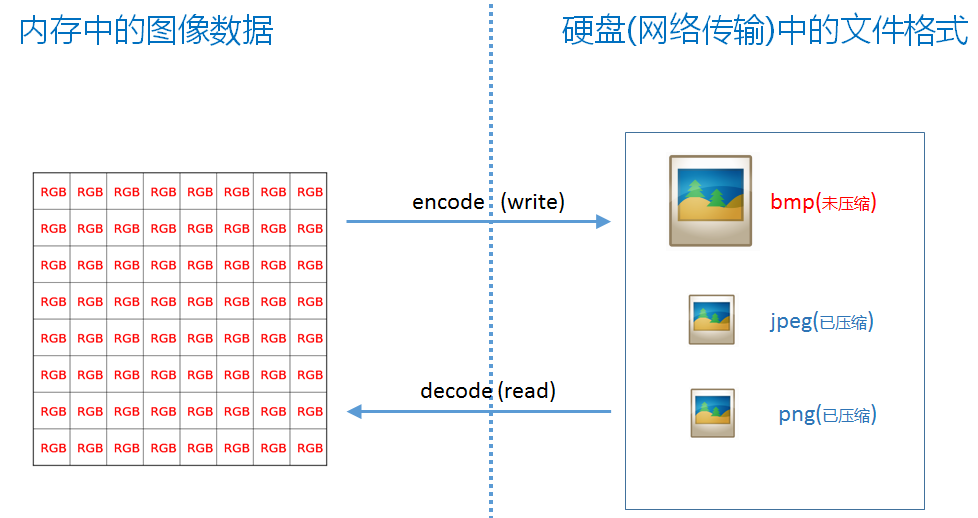
图片格式的必要性
如果将图像原始格式直接存储到文件中将会非常大,比如一个50005000 24位图,所占文件大小为50005000*3字节=71.5MB, 其大小非常可观。 如果用zip或rar之类的通用算法来压缩像素数据,得到的压缩比例通常不会太高,因为这些压缩算法没有针对图像数据结构进行特殊处理。 于是就有了jpeg,png等格式,同样是图像压缩算法jpeg和png也有不同的适用场景,具体在下文再阐述。

所以可以总结如下: jpeg,png文件之于图像,就相当于zip,rar格式之于普通文件(用zip,rar格式对普通文件进行压缩)。
BMP格式
bmp格式没有压缩像素格式,存储在文件中时先有文件头、再图像头、后面就都是像素数据了,上下颠倒存储。 用windows自带的mspaint工具保存bmp格式时,可以发现有四种bmp可供选择: 单色: 一个像素只占一位,要么是0,要么是1,所以只能存储黑白信息 16色位图: 一个像素4位,有16种颜色可选 256色位图: 一个像素8位,有256种颜色可选 24位位图: 就是图(1)所示的位图,颜色可有2^24种可选,对于人眼来说完全足够了。
这里为了简单起见,只详细讨论最常见的24位图的bmp格式。
现在来看其文件头和图片格式头的结构:
| 文件头信息 | ||
|---|---|---|
| 字段 | 大小(字节) | 描述 |
| bfType | 2 | 一定为19778,其转化为十六进制为0x4d42,对应的字符串为BM |
| bfSize | 4 | 文件大小 |
| bfReserved1 | 2 | 一般为0 |
| bfReserved2 | 2 | 一般为0 |
| bfOffBits | 4 | 从文件开始处到像素数据的偏移,也就是这两个结构体大小之和 |
| bmp图片结构头 | ||
|---|---|---|
| 字段 | 大小(字节) | 描述 |
| biSize | 4 | 此结构体的大小 |
| biWidth | 4 | 图像的宽 |
| biHeight | 4 | 图像的高 |
| biPlanes | 2 | 图像的帧数,一般为1 |
| biBitCount | 2 | 一像素所占的位数,一般是24 |
| biCompression | 4 | 一般为0 |
| biSizeImage | 4 | 像素数据所占大小,即上面结构体中文件大小减去偏移(bfSize-bfOffBits) |
| biXPelsPerMeter | 4 | 一般为0 |
| biXPelsPerMeter | 4 | 一般为0 |
| biClrUsed | 4 | 一般为0 |
| biClrImportant | 4 | 一般为0 |
本来在windows平台下wingdi.h文件中已经有这些结构的定义,不过为了不依赖与windows,实现为跨平台,本人将wingdi.h中的这两个结构“偷用”出来了。代码如下:

由于bmp格式比较简单,本人已实现了一份简单的c++代码,具有读取、保存bmp图片的功能,只支持24位的bmp格式。
代码在 http://git.oschina.net/xiangism/blogData 的“常见图片格式详解/ImageDemo/BmpDemo”文件夹中。
虽然这里只建立了vs2008项目,但代码在linux, mac平台下都可以编译通过。
需要说明的是为了统一处理,将bmp读取到LBitmap::m_pixel中时就将其转化为32位从上往下排列的图像格式了。并且会有y坐标的转化。 所以在读取的时候会有一个temp_line先存储文件中的24位数据,再转化为32位数据。在保存时也是先将32位数据转化到temp_line的24位数据上,然后再写入文件。(如果仅仅是处理bmp,那么这么多的一个A通道是冗余数据,但后面处理png图片时就会用到这个A通道)
如果用上面的代码来读取如图所示的图片(放大8倍后的显示图):

右上角像素为RGB(255, 128, 0)
ln::LBitmap bmp;
bmp.ReadBmp(L"one.bmp");
unsigned char *p = bmp.Pixel(0, 0);
printf("%d, %d, %d\n", p[0], p[1], p[2]); //显示左上角的像素值
bmp.WriteBmp(L"out.bmp");  //保存到文件,可以测试是否能正确读取和保存bmp
运行的结果为: 0,128,255 可以看出像素分布为BGR
ps:
- bmp格式也是可以压缩.
- bmp格式也可以有颜色板。颜色板就是一个颜色的索引,上面说过bmp格式一个像素可以只有2个,16个或256个取值。就拿单色位图来说明,默认为0对应RGB(0,0,0) 1,对应RGB(255, 255, 255) 如果颜色板这样定义: 0对应 RGB(255,0, 0)红 1对应 RGB(0, 255, 0)绿 这样黑白图就成了红绿图
JPEG格式
- jpeg是有损压缩格式, 将像素信息用jpeg保存成文件再读取出来,其中某些像素值会有少许变化。在保存时有个质量参数可在[0,100]之间选择,参数越大图片就越保真,但图片的体积也就越大。一般情况下选择70或80就足够了。
- jpeg没有透明信息。
- jpeg比较适合用来存储相机拍出来的照片,这类图像用jpeg压缩后的体积比较小。其使用的具体算法核心是离散余弦变换、Huffman编码、算术编码等技术,有兴趣的同学可以在网上找一大堆资料,本文就不详细介绍了。
接下来要介绍一个有关jpeg非常实用的技术—— jpeg格式支持不完全读取整张图片,即可以选择读取原图、1/2、1/4、1/8大小的图片 比如50005000的一张大图,可以只读取将其缩小成1/8后即625625大小的图片。 这样比先完全读取50005000的图像,再用算法缩小成625625大小不知快多少倍。 如果应用需求只需要一张小图时,这种读取方式就可以大显身手了。
在c代码中读取jpeg一般是使用libjpeg, 这个库提供了不完全读取图片的功能。
给ln::LBitmap添加有关jpeg的接口,如下ReadJpeg()第三个参数fraction可取值为1,2,4,8,分别对应1/1,1/2,1/4,1/8
```
在上面LBitmap的基本上加入下面5个函数:
// 不读取像素数据,只读取jpeg文件的大小, 用指针*width, *height做为传出参数, 返回值bool返回文件是否为jpeg格式
static bool ReadJpegSize(const wchar_t *path, int *width, int *height);
// 判断文件是否为jpeg格式
static bool IsJpegFile(const wchar_t *fileame);
// 读取jpeg,fraction可取值为1, 2, 4, 8
bool ReadJpeg(const wchar_t *filename, int fraction = 1);
// 按照width, height的大小读取合适的jpeg大小, 所得的图像大小不会超过width*height
bool ReadFitJpeg(const wchar_t *filename, int width, int height);
// 保存jpeg,quality范围是[0, 100]
bool WriteJpeg(const wchar_t *filename, int quality = 80);
```
JpegAPI
具体的实现在JpegDemo 用上面的函数进行jpeg的读取和保存的测试
```
ln::LBitmap bmp;
bmp.ReadBmp(L"one.bmp");
unsigned char *p = bmp.Pixel(0, 0);
printf("%d, %d, %d\n", p[0], p[1], p[2]);
bmp.WriteJpeg(L"one.jpg", 90);
```
读取one.bmp图片,然后保存成jpeg格式,one.jpg放大后显示如下

发现左上角的颜色发生了变化,并且也影响到周围的像素,就算将上面WriteJpeg()第二个参数换成100,也还是这种效果,这是Jpeg格式无法避免的问题 但如果读取一张风景照,再保存成Jpeg,就几乎看不出有什么差别了。
android平台下实现jpeg预读
4
BitmapFactory.Options opt = new BitmapFactory.Options();
opt.inJustDecodeBounds = true;
BitmapFactory.decodeFile(info.fullPath, opt); //这里仅仅只读取jpeg的大小
opt.inJustDecodeBounds = false;
if (opt.outWidth > opt.outHeight) {
    opt.inSampleSize = opt.outWidth / phSize;//hpSize是允许的图片宽高的最大值
} else {
    opt.inSampleSize = opt.outHeight / phSize;
}
Bitmap b = BitmapFactory.decodeFile(info.fullPath, opt);
将BitmapFactory.Options的inJustDecodeBounds 设置为true后,就只会读取Jpeg的大小,而不会去解析像素数据。然后再设置inSampleSize后,就可以根据这个值来读取适当大小的图片,研究android的源码后可以发现底层也是调用的libjpeg库来实现。
ios,mac
本人还没有在ios/mac中发现如何预读jpeg的官方API。Apple对图形、图像、多媒体领域提供了丰富接口,如果这个功能真没实现就太令我惊讶了! 不过ObjectC完全兼容C,可以调用libjpeg库来实现这个功能。
.NET下仅读取jpeg的大小
下面是用c#仅仅读取jpeg宽高(没有解析像素数据), 直接用C#读取1/2,1/4,1/8还不知道如何实现
5
FileStream stream = new FileStream(path, FileMode.Open);
Image img = Image.FromStream(stream, false, false);  //关键是将第三个参数设置为false
Console.WriteLine("size: {0},{1}", img.Width, img.Height);
jpeg批量转化工具
用相机拍出来的原始jpeg图片是高保真质量, 所占文件体积非常大,本人写了一个批量转化的工具,可以将jpeg的质量都转化成80, 图像的宽高不变, 这时人眼几乎看不出有什么差别, 但其体积只有原来的1/3. 如果有大量的照片需要保存时, 节约的空间就很客观了。实现原理很简单, 就是读取jpeg文件, 然后再保存. 用c#实现的,代码量非常少,在此贴出全部源码
6
class Program
    {
        static string src_path;
        static long small_size = 0;

        private static ImageCodecInfo GetCodecInfo(string mimeType)
        {
            ImageCodecInfo[] CodecInfo = ImageCodecInfo.GetImageEncoders();

            foreach (ImageCodecInfo ici in CodecInfo) {
                if (ici.MimeType == mimeType)
                    return ici;
            }
            return null;
        }

        static void SaveImage(string path)
        {
            FileStream stream = new FileStream(path, FileMode.Open, FileAccess.Read);

            if (stream.Length == 0) {
                stream.Close();
                return;
            }

            byte[] file_data = new byte[stream.Length];
            stream.Read(file_data, 0, (int)stream.Length);
            Stream mem = new MemoryStream(file_data);

            long old_size = stream.Length;

            try {
                Image img = new Bitmap(mem);
                stream.Close();

                EncoderParameter p = new EncoderParameter(System.Drawing.Imaging.Encoder.Quality, 80L);
                EncoderParameters ps = new EncoderParameters(1);

                ps.Param[0] = p;

                img.Save(path, GetCodecInfo("image/jpeg"), ps);

                FileStream f = new FileStream(path, FileMode.Open, FileAccess.Read);
                long new_size = f.Length;
                f.Close();

                small_size += old_size - new_size;

            } catch (System.Exception ex) {

            } finally {
                stream.Close();
            }

        }

        static void ConvertOneImage(string path, bool is_save)
        {
            if (is_save) {
                string new_name = src_path + path.Substring(path.LastIndexOf('\\'));
                File.Copy(path, new_name, true);
            }

            SaveImage(path);
        }

        static void ShowSize(string path)
        {
            FileStream stream = new FileStream(path, FileMode.Open);
            Image img = Image.FromStream(stream, false, false);
            stream.Close();
            //Console.WriteLine("{0} {1}", img.Width, img.Height);
            if (img.Width == 0) {
                Console.WriteLine("Error");
            }
        }

        static void BatchJpeg()
        {
            string path = Application.ExecutablePath;
            path = path.Substring(0, path.LastIndexOf('\\'));

            src_path = path + "\\" + "src";
            //Console.WriteLine(src_path);

            Console.WriteLine("批量转化jpeg图片,保证其图片质量的前提下减少其存储大小");
            Console.WriteLine("若想保存原图片,其按y(原图将放在src文件夹下), 否则按任意键开始处理");

            ConsoleKeyInfo key = Console.ReadKey();
            bool is_save = false;

            if (key.KeyChar == 'y' || key.KeyChar == 'Y') {
                is_save = true;

                Directory.CreateDirectory("src");
            }

            string[] files = Directory.GetFiles(path, "*.jpg");

            Stopwatch sw = new Stopwatch();
            sw.Start();

            for (int i = 0; i < files.Length; ++i) {
                ConvertOneImage(files[i], is_save);
                //string s = files[i].Substring(files[i].LastIndexOf('\\') + 1);
                //Console.WriteLine((i + 1).ToString() + "/" + files.Length.ToString() + " \t " + s);

                //ShowSize(files[i]);
            }

            sw.Stop();

            Console.WriteLine("*********已结束,按任意键结束********");
            double v = (small_size * 1.0 / (1024 * 1024));

            Console.WriteLine("共减少 " + v.ToString("0.00##") + "M 的存储空间");
            Console.WriteLine("耗时:" + sw.Elapsed.TotalSeconds.ToString("0.00##") + "秒");
            Console.ReadKey();
        }

        static void Main(string[] args)
        {
            BatchJpeg();
            //SaveImage("E:\\img - 副本.JPG");
            //string path = "E:\\cpp_app\\LiteTools\\JpegBatch\\bin\\Release\\img - 副本.JPG";
            //File.Delete(path);
        }
    }

JpegBatchConvert
Exif信息
另外jpeg文件一般有一个附属的exif信息,这个信息中有图像大小,拍摄时间,拍摄的相关参数,照片方向,图像缩略图等信息。
用相机拍出来的jpeg都会有这个信息。如果照片方向不是正立的话,在读取到像素取后,还得按exif所指明的方向将图像旋转下。mspaint程序就没有做这个处理,有些图片用picasa查看和用mspaint查看方向就不一样。当然为了简单起见,上面的LBitmap中也自动忽略了exif信息及其图像拍摄时的方向。
如果不用读取1/2,1/4,1/8的方法,也可以从exif中来读取缩略图,但这个缩略图一般很小。
说到exif,不得不说一款用perl实现的命令行工具:exiftool。几乎所有的多媒体文件(图像、音乐、视频)都可以用这个工具来查看其有关信息,当然如果不是jpeg文件就是指广义上的”exif”。在git中有已经编译好可执行文件exiftool.exe。使用方法是将这个文件放到系统路径下,然后在想查看的文件路径下执行 exiftool filename
在实现BatchJpeg工具时如果仅仅用上面实现的LBitmap来读取,保存, 将会失去exif信息, 而相片的拍摄时间等信息又很重要, 所以还得用另一个库exiv2来读取写入exif。如果用c#, 用上面的代码exif信息会自动保留下来。默默地向c#致敬。
intelJpeg库
如果在win32环境下对jpeg IO速度有很高的要求,可以使用interlJpeg库,不开源,但提供有.h,.lib文件。这个库可以大大提高jpg读取、保存速度。
当时分别用c#和c实现了jpeg批量转化工具, 在处理大量图片时发现c#用时居然只有c的一半。太奇怪了,按理说,c的速度比c#应该快才对啊, 而实事是c慢了这么多。 最后发现问题就在libjpeg上,用了intetJpeg后速度就和c#差不多了(猜想.NET内部也是用intelJpeg来处理jpeg)。
PNG格式
- png是一种无损压缩格式, 压缩大概是用行程编码算法。
- png可以有透明效果。
- png比较适合适量图,几何图。 比如本文中出现的这些图都是用png保存,比用joeg保存体积要小。
再强调一下: jpeg比较适合存储色彩“杂乱”的拍摄图片,png比较适合存储几何特征强的图形类图片。
png可能有24位图和32位图之分。32位图就是带有alpha通道的图片。 将图片a绘制到另一幅图片b上,如果图片a没有alpha通道,那么就会完全将b图片的像素给替换掉。而如果有alpha通道,那么最后覆盖的结果值将是c = aalpha + b(1-alpha) 再对LBitmap添加png的支持。 添加接口如下:
static bool ReadPngSize(const wchar_t *path, int *width, int *height);
static bool IsPngFile(const wchar_t *filename);
bool ReadPng(const wchar_t *filename);
bool WritePng(const wchar_t *filename);
具体实现在PngDemo中。有调用libpng库,并且libpng库依赖zlib库(由此可以看出png算法有用到常规的压缩算法)。
GIF格式
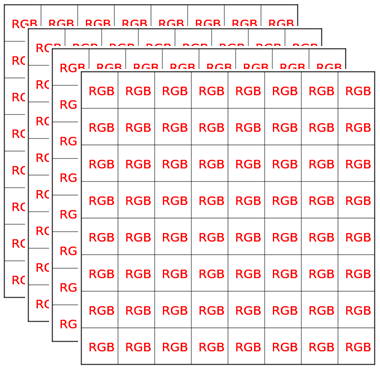
上面提到的bmp,jpeg,png图片都只有一帧,而gif可以保存多帧图像,如图所示

libgif库可以用来读取gif图片。gif中有个参数可以控制图片变化的快慢。在程序中可以使用这个参数,也可以自己定义一个参数,这就是为什么gif图片,在不同程序中查看时其变化速度不一样。
webp
google开发的一种有损、透明图片格式,相当于jpeg和png的合体,google声称其可以把图片大小减少40%。
一个强大的格式库,CxImage
CxImage几乎可以读取任何图片格式
下面是其头文件中的宏定义:
#define CXIMAGE_SUPPORT_WINDOWS 1
#define CXIMAGE_SUPPORT_EXIF    1
#define CXIMAGE_SUPPORT_BMP 1
#define CXIMAGE_SUPPORT_GIF 1
#define CXIMAGE_SUPPORT_JPG 1
#define CXIMAGE_SUPPORT_PNG 1
#define CXIMAGE_SUPPORT_ICO 1
#define CXIMAGE_SUPPORT_TIF 1
#define CXIMAGE_SUPPORT_TGA 1
#define CXIMAGE_SUPPORT_PCX 1
#define CXIMAGE_SUPPORT_WBMP 1
#define CXIMAGE_SUPPORT_WMF 1

#define CXIMAGE_SUPPORT_JP2 1
#define CXIMAGE_SUPPORT_JPC 1
#define CXIMAGE_SUPPORT_PGX 1
#define CXIMAGE_SUPPORT_PNM 1
#define CXIMAGE_SUPPORT_RAS 1

#define CXIMAGE_SUPPORT_MNG 1
#define CXIMAGE_SUPPORT_SKA 1
#define CXIMAGE_SUPPORT_RAW 1
#define CXIMAGE_SUPPORT_PSD 1
CxImage在针对特定格式时,也是调用了其它图片库(比如libjpeg, libpng, libtiff)。由于CxImage太过庞大,如果不想使用其全部代码,可以自己从中“偷取”特定图片格式的读取、保存代码。
![]()
![]()
![]()
![]()
一个数量级
数量级是指数量的尺度或大小的级别,每个级别之间保持固定的比例。通常采用的比例有 10,2,1000,1024, e (欧拉数,大约等于 2.71828182846 的超越数,即自然对数的底)。
通常情况下,数量级指一系列 10 的幂(次方),即相邻两个数量级之间比为 10。例如说两数相差三个数量级,其实就是说一个数比另一个大 1000 倍。本文主要描述十进制下的数量级,并采用科学记数法表示。
| 10 的幂 | 科学记数法 | 数量级 |
|---|---|---|
| 0.001 | 10−3 | −3 |
| 0.01 | 10−2 | −2 |
| 0.1 | 10−1 | −1 |
| 1 | 100 | 0 |
| 10 | 101 | 1 |
| 100 | 102 | 2 |
| 1000 | 103 | 3 |
| 10000 | 104 | 4 |
ARM
ARM处理器是英国Acorn有限公司设计的低功耗成本的第一款RISC微处理器。全称为Advanced RISC Machine。ARM处理器本身是32位设计,但也配备16位指令集,一般来讲比等价32位代码节省达35%,却能保留32位系统的所有优势。
他山之石
总结:可以做一个软件窗口,给主程序加一个快捷方式,这样一个软件就做好了;很棒。
Mac 的自动化 AppleScript 终极入门手册
https://wenku.baidu.com/view/41c783c3aa00b52acfc7ca09.html
github样例工程
https://github.com/BenXia/AppleScriptStudy/tree/master/5_快发邮件OC版本
https://github.com/BenXia/AppleScriptStudy/tree/master/5_%E5%BF%AB%E5%8F%91%E9%82%AE%E4%BB%B6OC%E7%89%88%E6%9C%AC/SendMail

初识 AppleScript
https://www.jianshu.com/p/a22084e87b09

png to icns网址
app storen 商店;仓库-- AppIconbuilder 区分大小写
https://zhuanhuan.supfree.net/ling.asp?e=icns
https://cloudconvert.com/png-to-icns


